> ## Documentation Index
> Fetch the complete documentation index at: https://docs.thanx.com/llms.txt
> Use this file to discover all available pages before exploring further.
# Databricks
> Configuring your Databricks destination.
## Prerequisites
* [ ] By default, this Databricks integration makes use of Unity Catalog data governance features. You will need Unity Catalog enabled on your Databricks Workspace.
## Step 1: Create a SQL warehouse
Create a new SQL warehouse for data writing.
1. Log in to the Databricks account.
2. In the navigation pane, click **SQL Warehouses**.
3. In the SQL Warehouses console, click **Create SQL Warehouse**.
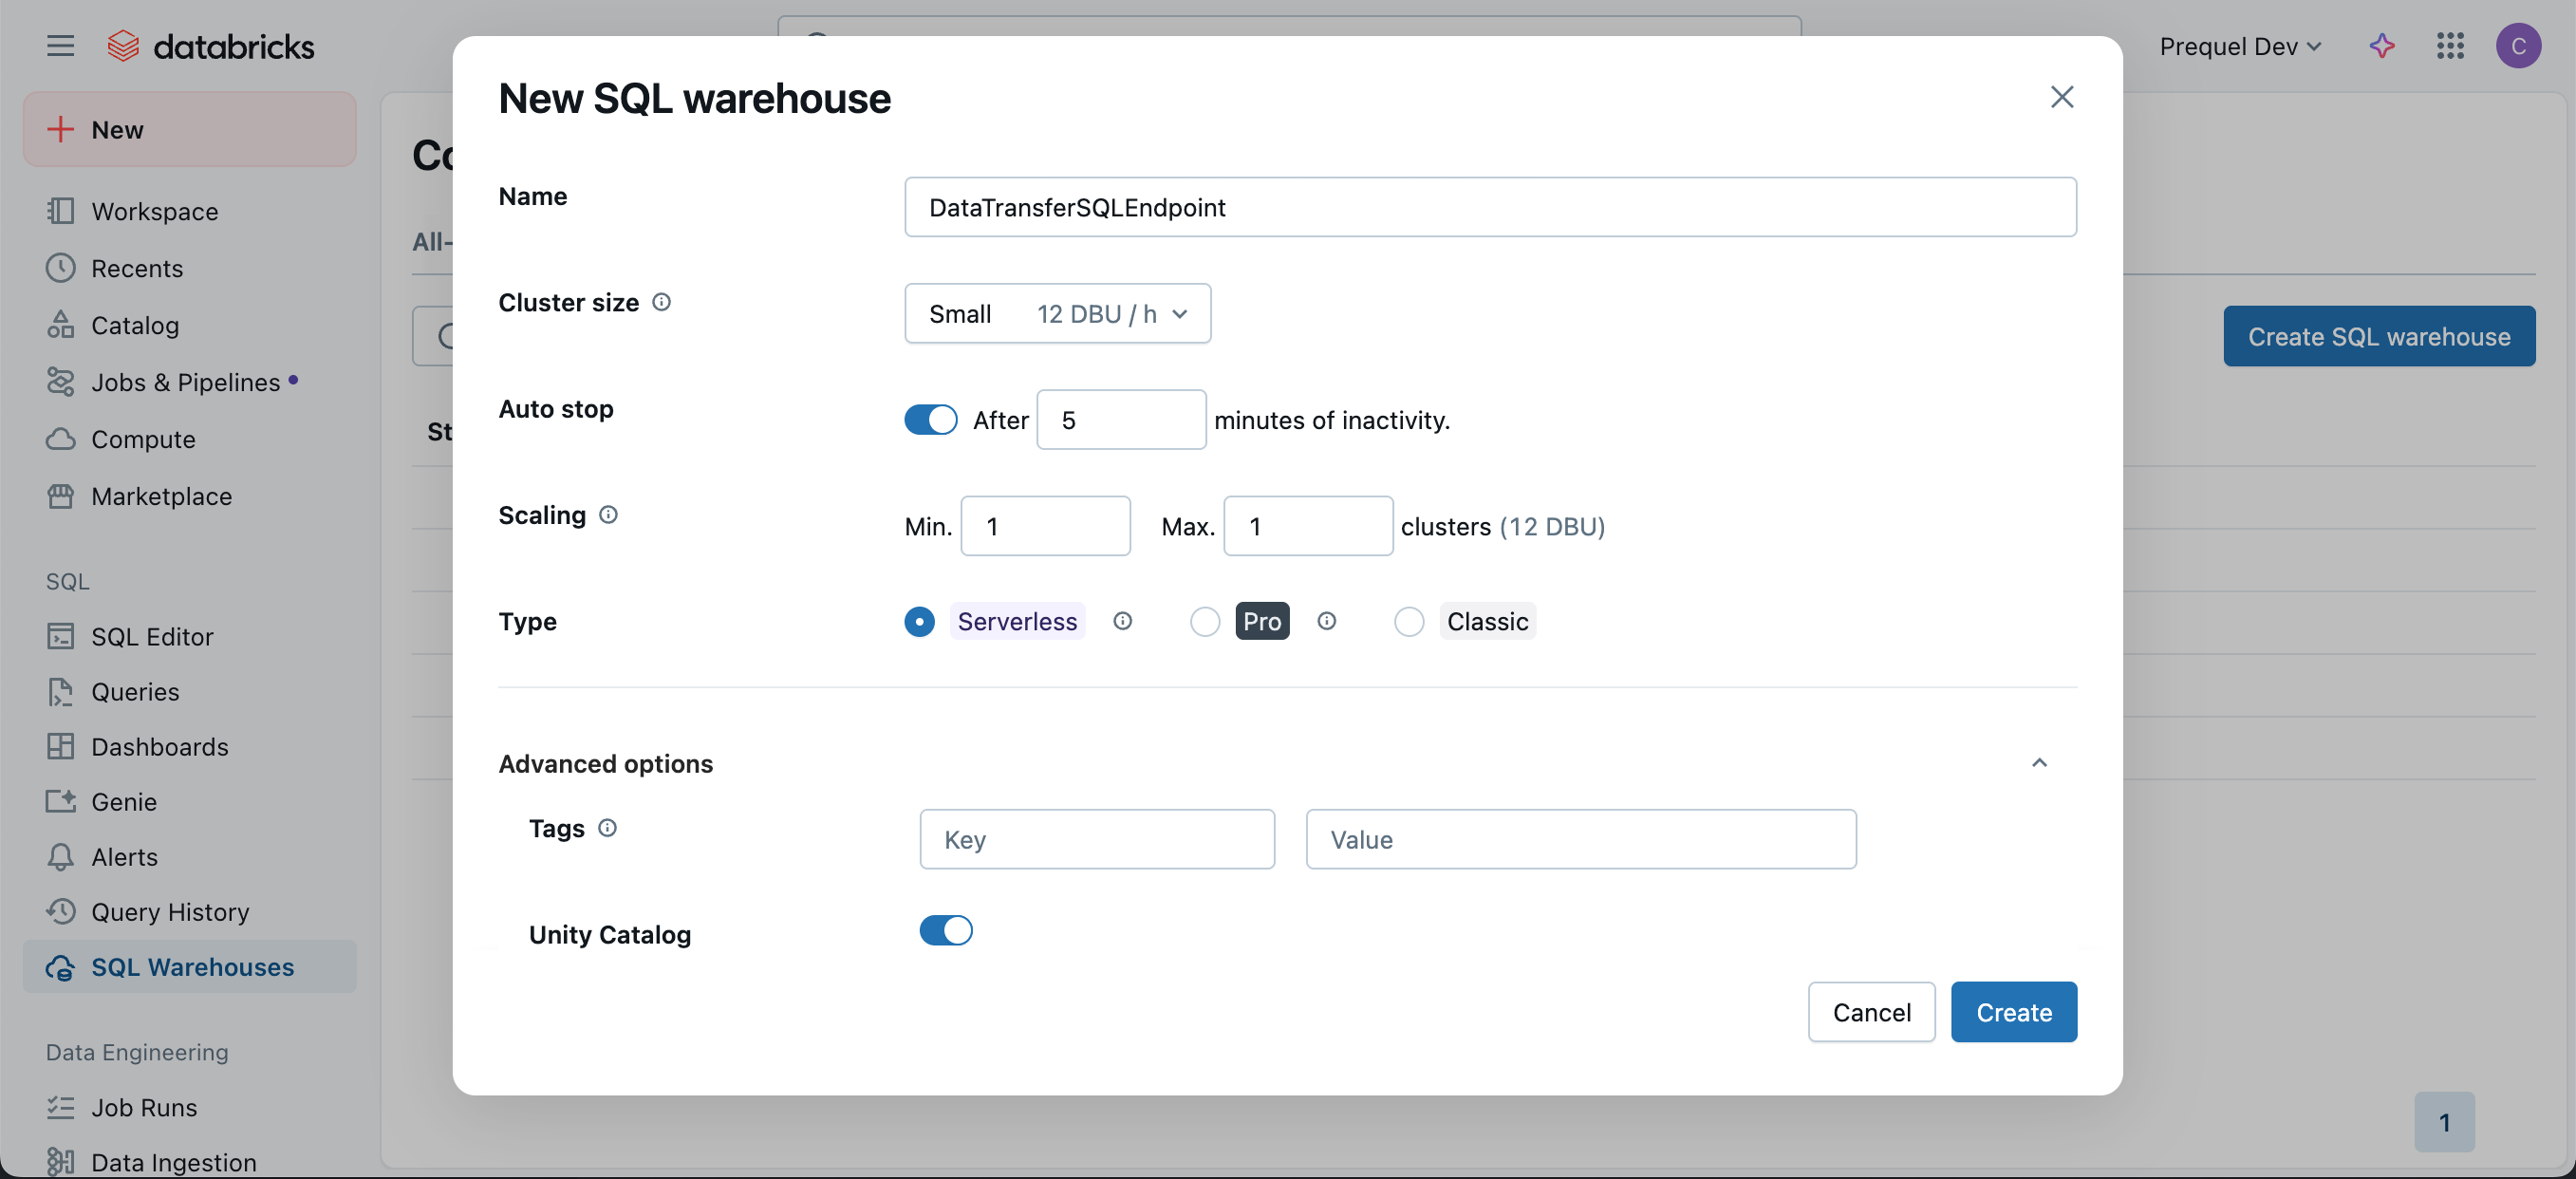
4. In the **New SQL Warehouse** menu, choose a **Name** and configure the options for the new SQL warehouse. Under "Advanced options" ensure "Unity Catalog" is in the **On** position and click **Create**.
## Step 2: Configure Access
1. In your Databricks workspace, click your username or icon in the top right, click **Settings**, **Identity and access**, and next to the **Service Principals** options, click **Manage**.
2. Click the **Add service principal** button, click **Add new** in the modal, enter a display name and click **Add**.
3. Click on the newly created Service Principal, and under the **Secrets** tab, click **Generate secret**.
4. Enter a lifetime for the secret (e.g., 90 days, 180 days, or 365 days), click **Generate** and make a note of the **Secret** value and **Client ID**.
5. Navigate back to the **SQL Warehouses** section of your Workspace, click the **SQL Warehouses** tab, and select the **SQL Warehouse** you created in **Step 1**. Click **Permissions** in the top right, search for and select the **Service Principal** you created, select the **Can use** permission, and click **Add**.
6. In the Databricks UI, select the **Catalog** tab, and select the target **Catalog**. Within the catalog **Permissions** tab, click **Grant**. In the following modal, select the **Service principal** for which you generated the OAuth token, select `USE CATALOG`, and click **Grant**.
7. Under the target **Catalog**, select the target **schema** (e.g., `main.default`, or create a new target schema). Within the schema **Permissions** tab, click **Grant**. In the following modal, select the **principal** for which you generated the access token, and select either `ALL PRIVILEGES` or the following 9 privileges and then click **Grant**:
* `USE SCHEMA`
* `APPLY TAG`
* `MODIFY`
* `READ VOLUME`
* `SELECT`
* `WRITE VOLUME`
* `CREATE MATERIALIZED VIEW`
* `CREATE TABLE`
* `CREATE VOLUME`
Collect connection information and create an access token for the data transfer service.
1. In the **SQL Warehouses** console, select the SQL warehouse you created in **Step 1**.
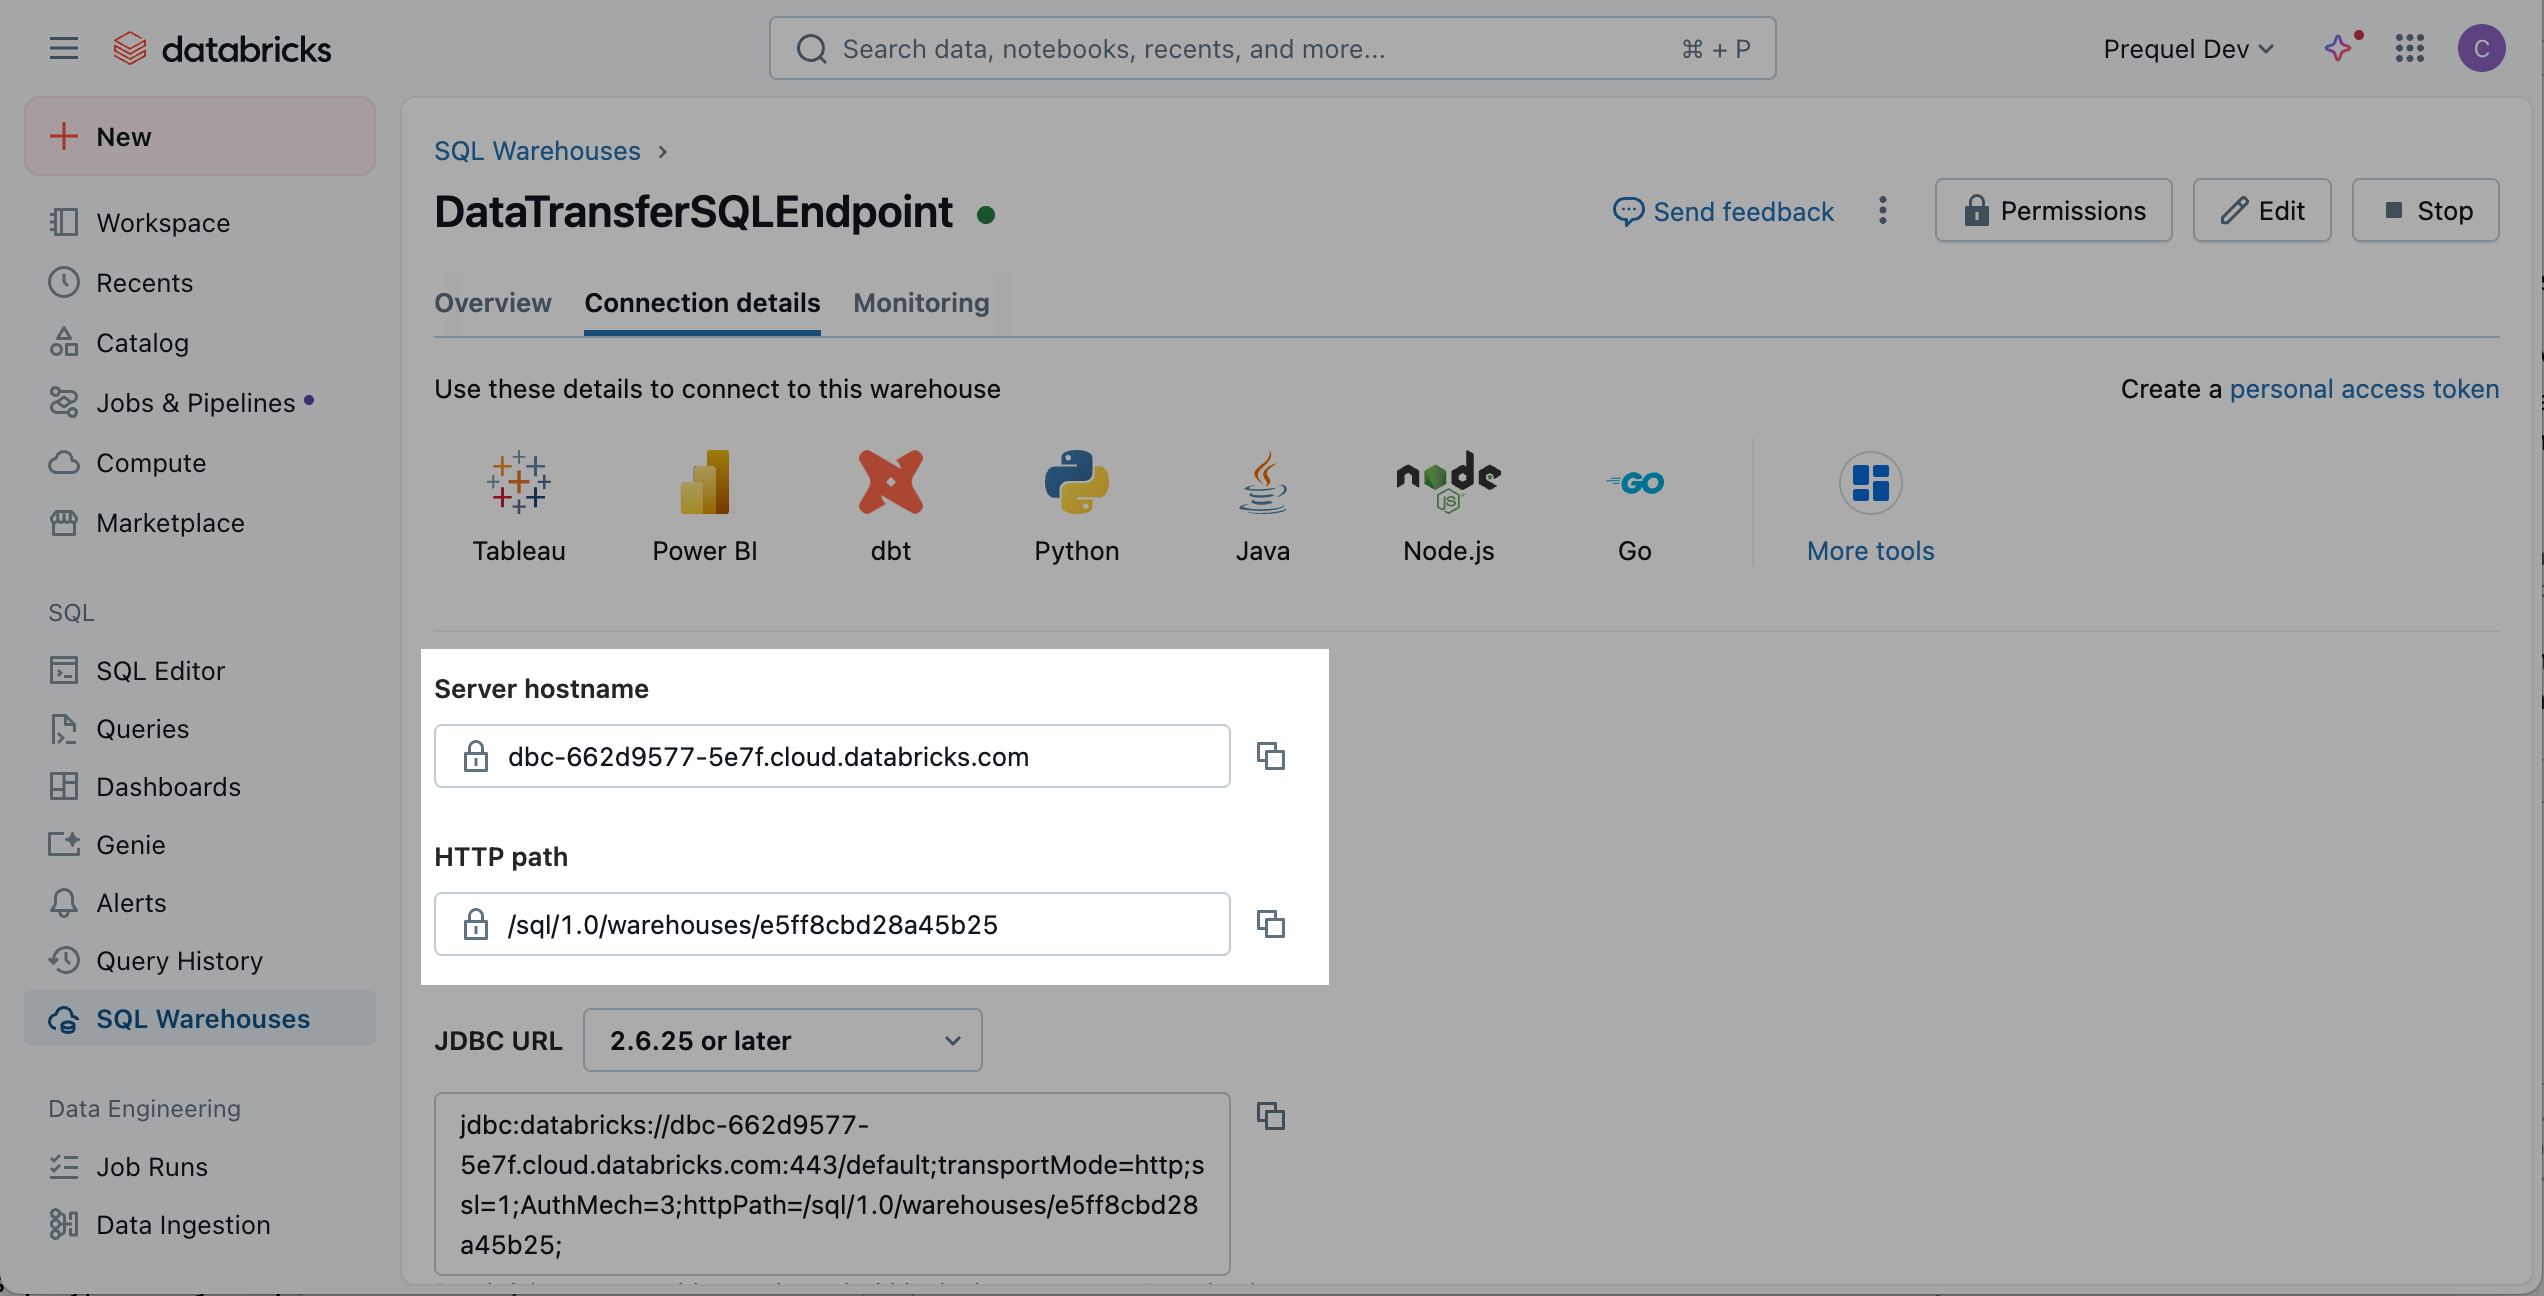
2. Click the **Connection Details** tab, and make a note of the **Server hostname**, **Port**, and **HTTP path**.
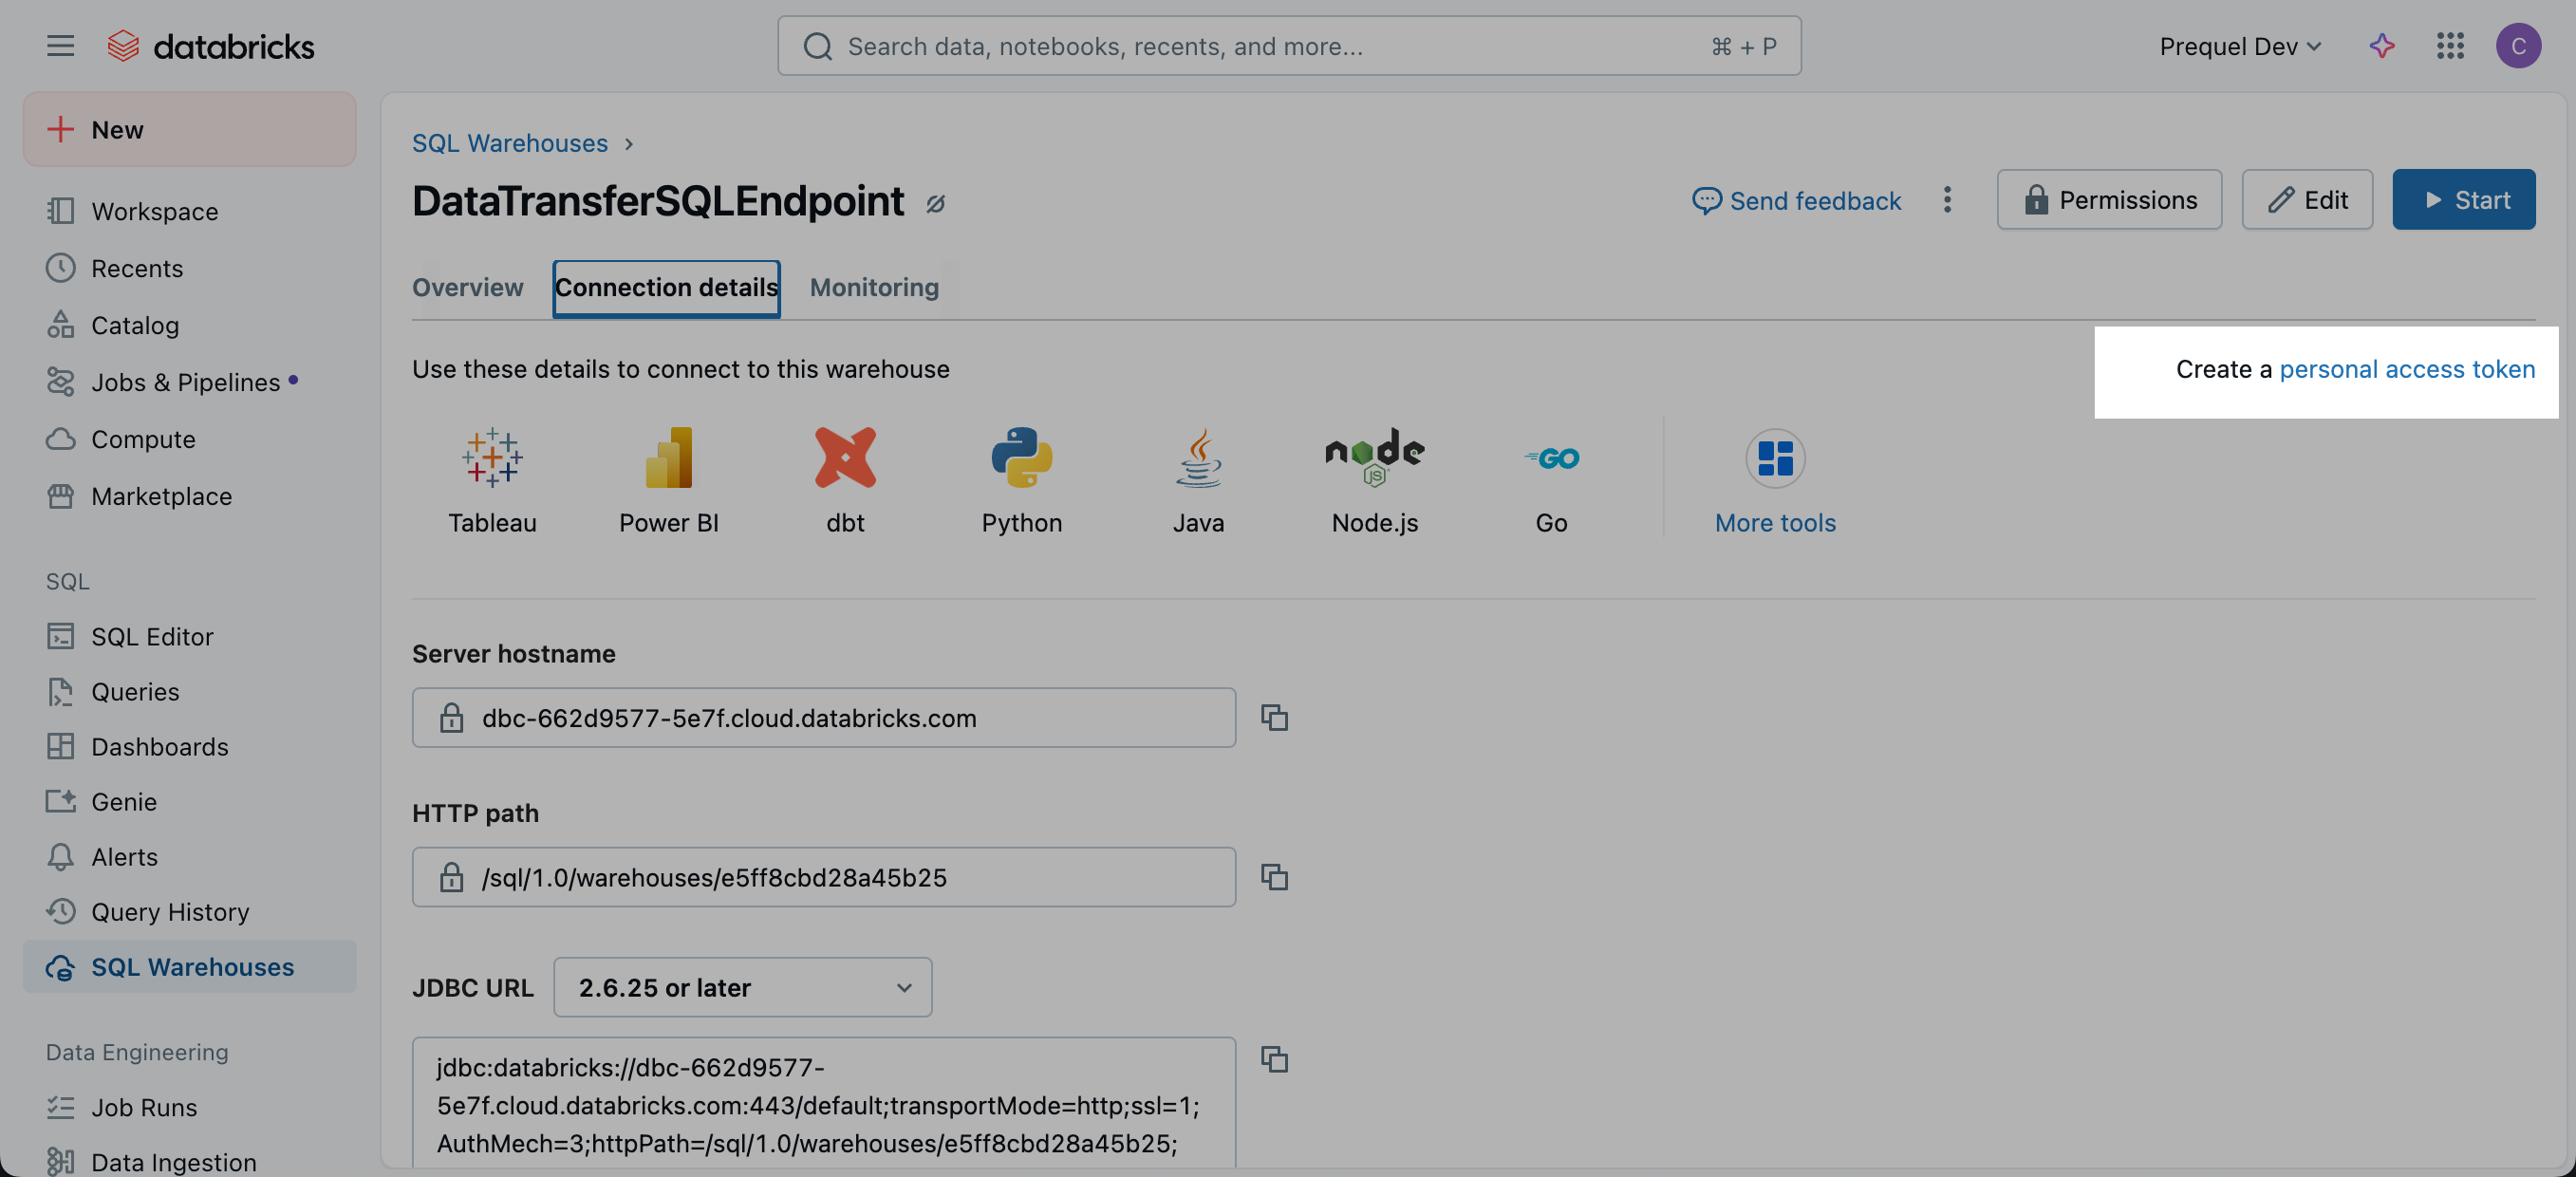
3. Click the link to Create a **personal access token**.
4. Click **Generate New Token**.
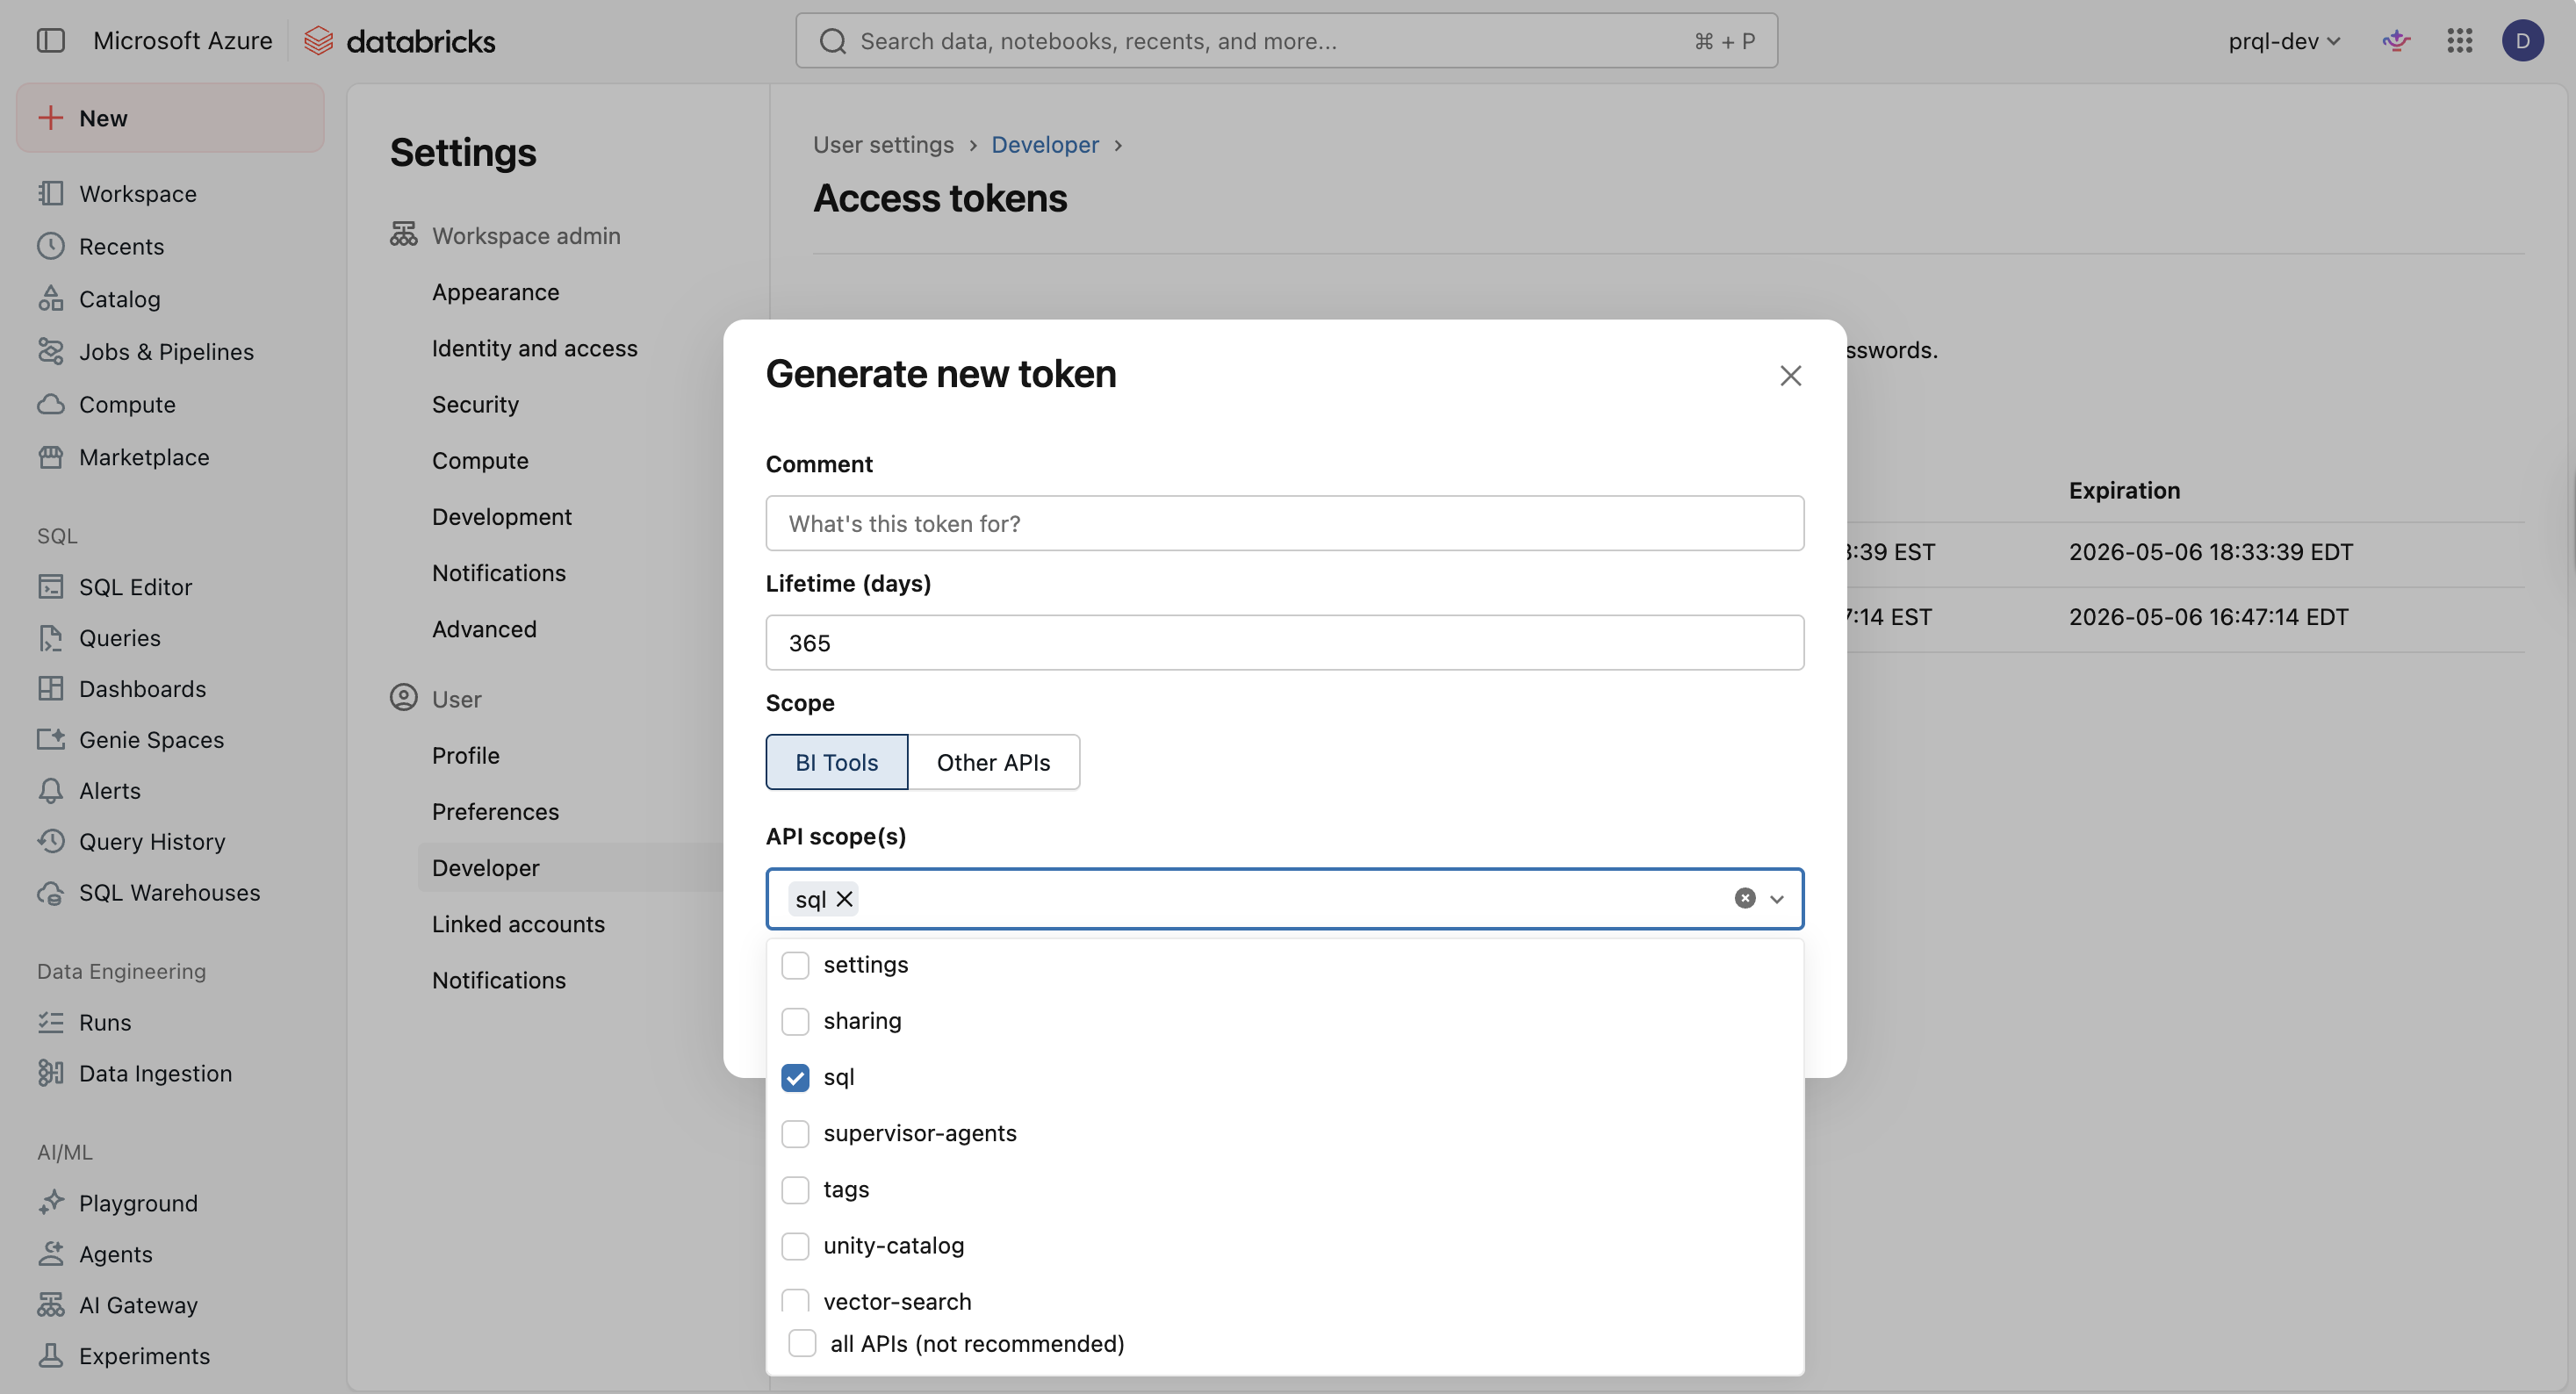
5. Name the token with a descriptive comment and assign the token lifetime. A longer lifetime will ensure you do not have to update the token as often. If PAT scopes are enabled on your workspace, select the `sql` scope. Click **Generate**.
6. In the pop up that follows, **copy the token** and securely save the token.
**Using a Service Principal & a Personal Access Token ("PAT") tied to the Service Account**
You may prefer to create a **Service Principal** with a PAT to use for authentication instead of using your account's Personal Access Token. To do so, use the following steps to create a Service Principal and generate a PAT on behalf of the Service Principal.
1. In your Databricks workspace, click your username or icon in the top right, click **Settings**, **Identity and access**, and next to the **Service Principals** options, click **Manage**.
2. Click the **Add service principal** button, click **Add new** in the modal, enter a display name and click **Add**.
3. Click on the newly created Service Principal, and under **Entitlements** select **Databricks SQL Access** and **Workspace Access**. Click **Update**, and make a note of the **Application ID** of your newly created Service Principal.
4. Back in the **Admin Settings** menu, click the **Advanced** section (under the **Workspace admin** menu). In the **Access Control** section, next to the **Personal Access Tokens** row, click **Permission Settings**. Search for and select the **Service Principal** you created, select the **Can use** permission, click **Add**, and then **Save**.
5. Navigate back to the **SQL Warehouses** section of your Workspace, click the **SQL Warehouses** tab, and select the **SQL Warehouse** you created in **Step 1**. Click **Permissions** in the top right, search for and select the **Service Principal** you created, select the **Can use** permission, and click **Add**.
6. Use your terminal to generate a **Service Principal Access Token** using your Personal Access Token generated above. Record the **token value**. This token can now be used as the access token for the connection.
```bash theme={null}
curl --request POST "https://.cloud.databricks.com/api/2.0/token-management/on-behalf-of/tokens" \
--header "Authorization: Bearer " \
--data '{
"application_id": "",
"lifetime_seconds": ,
"comment": ""
}'
```
7. In the Databricks UI, select the **Catalog** tab, and select the target **Catalog**. Within the catalog **Permissions** tab, click **Grant**. In the following modal, select the **principal** for which you generated the access token, select `USE CATALOG`, and click **Grant**.
8. Under the target **Catalog**, select the target **schema** (e.g., `main.default`, or create a new target schema). Within the schema **Permissions** tab, click **Grant**. In the following modal, select the **principal** for which you generated the access token, and select either `ALL PRIVILEGES` or the following 9 privileges and then click **Grant**:
* `USE SCHEMA`
* `APPLY TAG`
* `MODIFY`
* `READ VOLUME`
* `SELECT`
* `WRITE VOLUME`
* `CREATE MATERIALIZED VIEW`
* `CREATE TABLE`
* `CREATE VOLUME`
**IP Access Lists (optional)**
If your workspace enforces Databricks IP Access Lists, allowlist the static egress IP(s) used by the data-syncing service so connections and test sessions can open successfully. See Databricks documentation: [Databricks IP Access Lists](https://learn.microsoft.com/en-us/azure/databricks/security/network/front-end/ip-access-list).
Cloud-hosted (US): `35.192.85.117/32`
Cloud-hosted (EU): `104.199.49.149/32`
If private-cloud or self-hosted, contact your Thanx representative for the static egress IP.
## Step 3: Add your destination
Securely share your **server hostname**, **HTTP path**, **catalog**, your chosen **schema name**, and authentication details with us to complete the connection.
## Permissions checklist
* Workspace: Service principal or user has permission to use the target SQL warehouse ("Can use").
* Unity Catalog: `USE CATALOG` on the target catalog; appropriate privileges on the target schema (e.g., `USE SCHEMA`, `CREATE TABLE`, and read/write volume privileges as needed), or `ALL PRIVILEGES` on the schema.
* If using Hive Metastore (instead of UC): select the `hive` metastore explicitly and configure required object storage staging (bucket and credentials), with write/delete permissions.
* Network: if IP Access Lists are enabled, the static egress IP(s) are allowlisted.
**Optional: add a short retention lifecycle policy (Hive Metastore only)**
If using an S3 staging bucket with Hive Metastore, you may configure a lifecycle rule on the bucket to automatically delete objects older than 2 days, since the bucket is not used to persist data. In the bucket's **Management** tab, click **Create lifecycle rule**, and set an expiration action for current versions of objects with a 2-day age. Transfer logic automatically cleans up files after each transfer completes, so this step is optional.
## FAQ
Recommended: OAuth with a service principal. OAuth issues short-lived tokens, scopes access via the principal's entitlements and UC grants, and supports centralized rotation and revocation. Personal Access Tokens (PATs) are supported where policy requires, but they are long-lived bearer tokens and typically inherit broader, user-level permissions.
The connection identity needs `Can use` on the SQL warehouse, `USE CATALOG` on the target catalog, and schema-level privileges to create/manage tables (or `ALL PRIVILEGES` on the schema). Missing `USE CATALOG` is a frequent cause of test-connection failures.
Provide server hostname, HTTP path, catalog, schema, and an OAuth client (service principal) or PAT with warehouse access. Collect the host and path from the SQL Warehouses console.
Yes. Unity Catalog is the default. For Hive Metastore, explicitly select `hive` in configuration and supply an S3 staging bucket and credentials. Using the wrong metastore type can cause discovery or permission issues.
This documentation is built and hosted on [Mintlify](https://mintlify.com), a developer documentation platform.