> ## Documentation Index
> Fetch the complete documentation index at: https://docs.thanx.com/llms.txt
> Use this file to discover all available pages before exploring further.
# BigQuery
> Configuring your BigQuery destination.
## Prerequisites
* [ ] By default, BigQuery authentication uses role-based access. You will need the data-syncing service's service account name available to grant access. It should look like `some-name@some-project.iam.gserviceaccount.com`.
## Understanding role-based authentication in BigQuery
**Two service accounts involved**
* **Destination service account (in your GCP project):** You create this service account in Step 1. It has permissions to BigQuery and Cloud Storage and is the identity that performs work inside your project.
* **The data-syncing service's service account:** Provided to you in the prerequisites. It does not have direct permissions to BigQuery or Cloud Storage. Instead, it is granted permission to "assume" the destination service account's role (using short-lived tokens via the Service Account Token Creator/User roles), enabling least-privilege, auditable access without sharing keys.
**See the end of this guide for frequently asked questions about the BigQuery destination.**
## Step 1: Create service account in BigQuery project
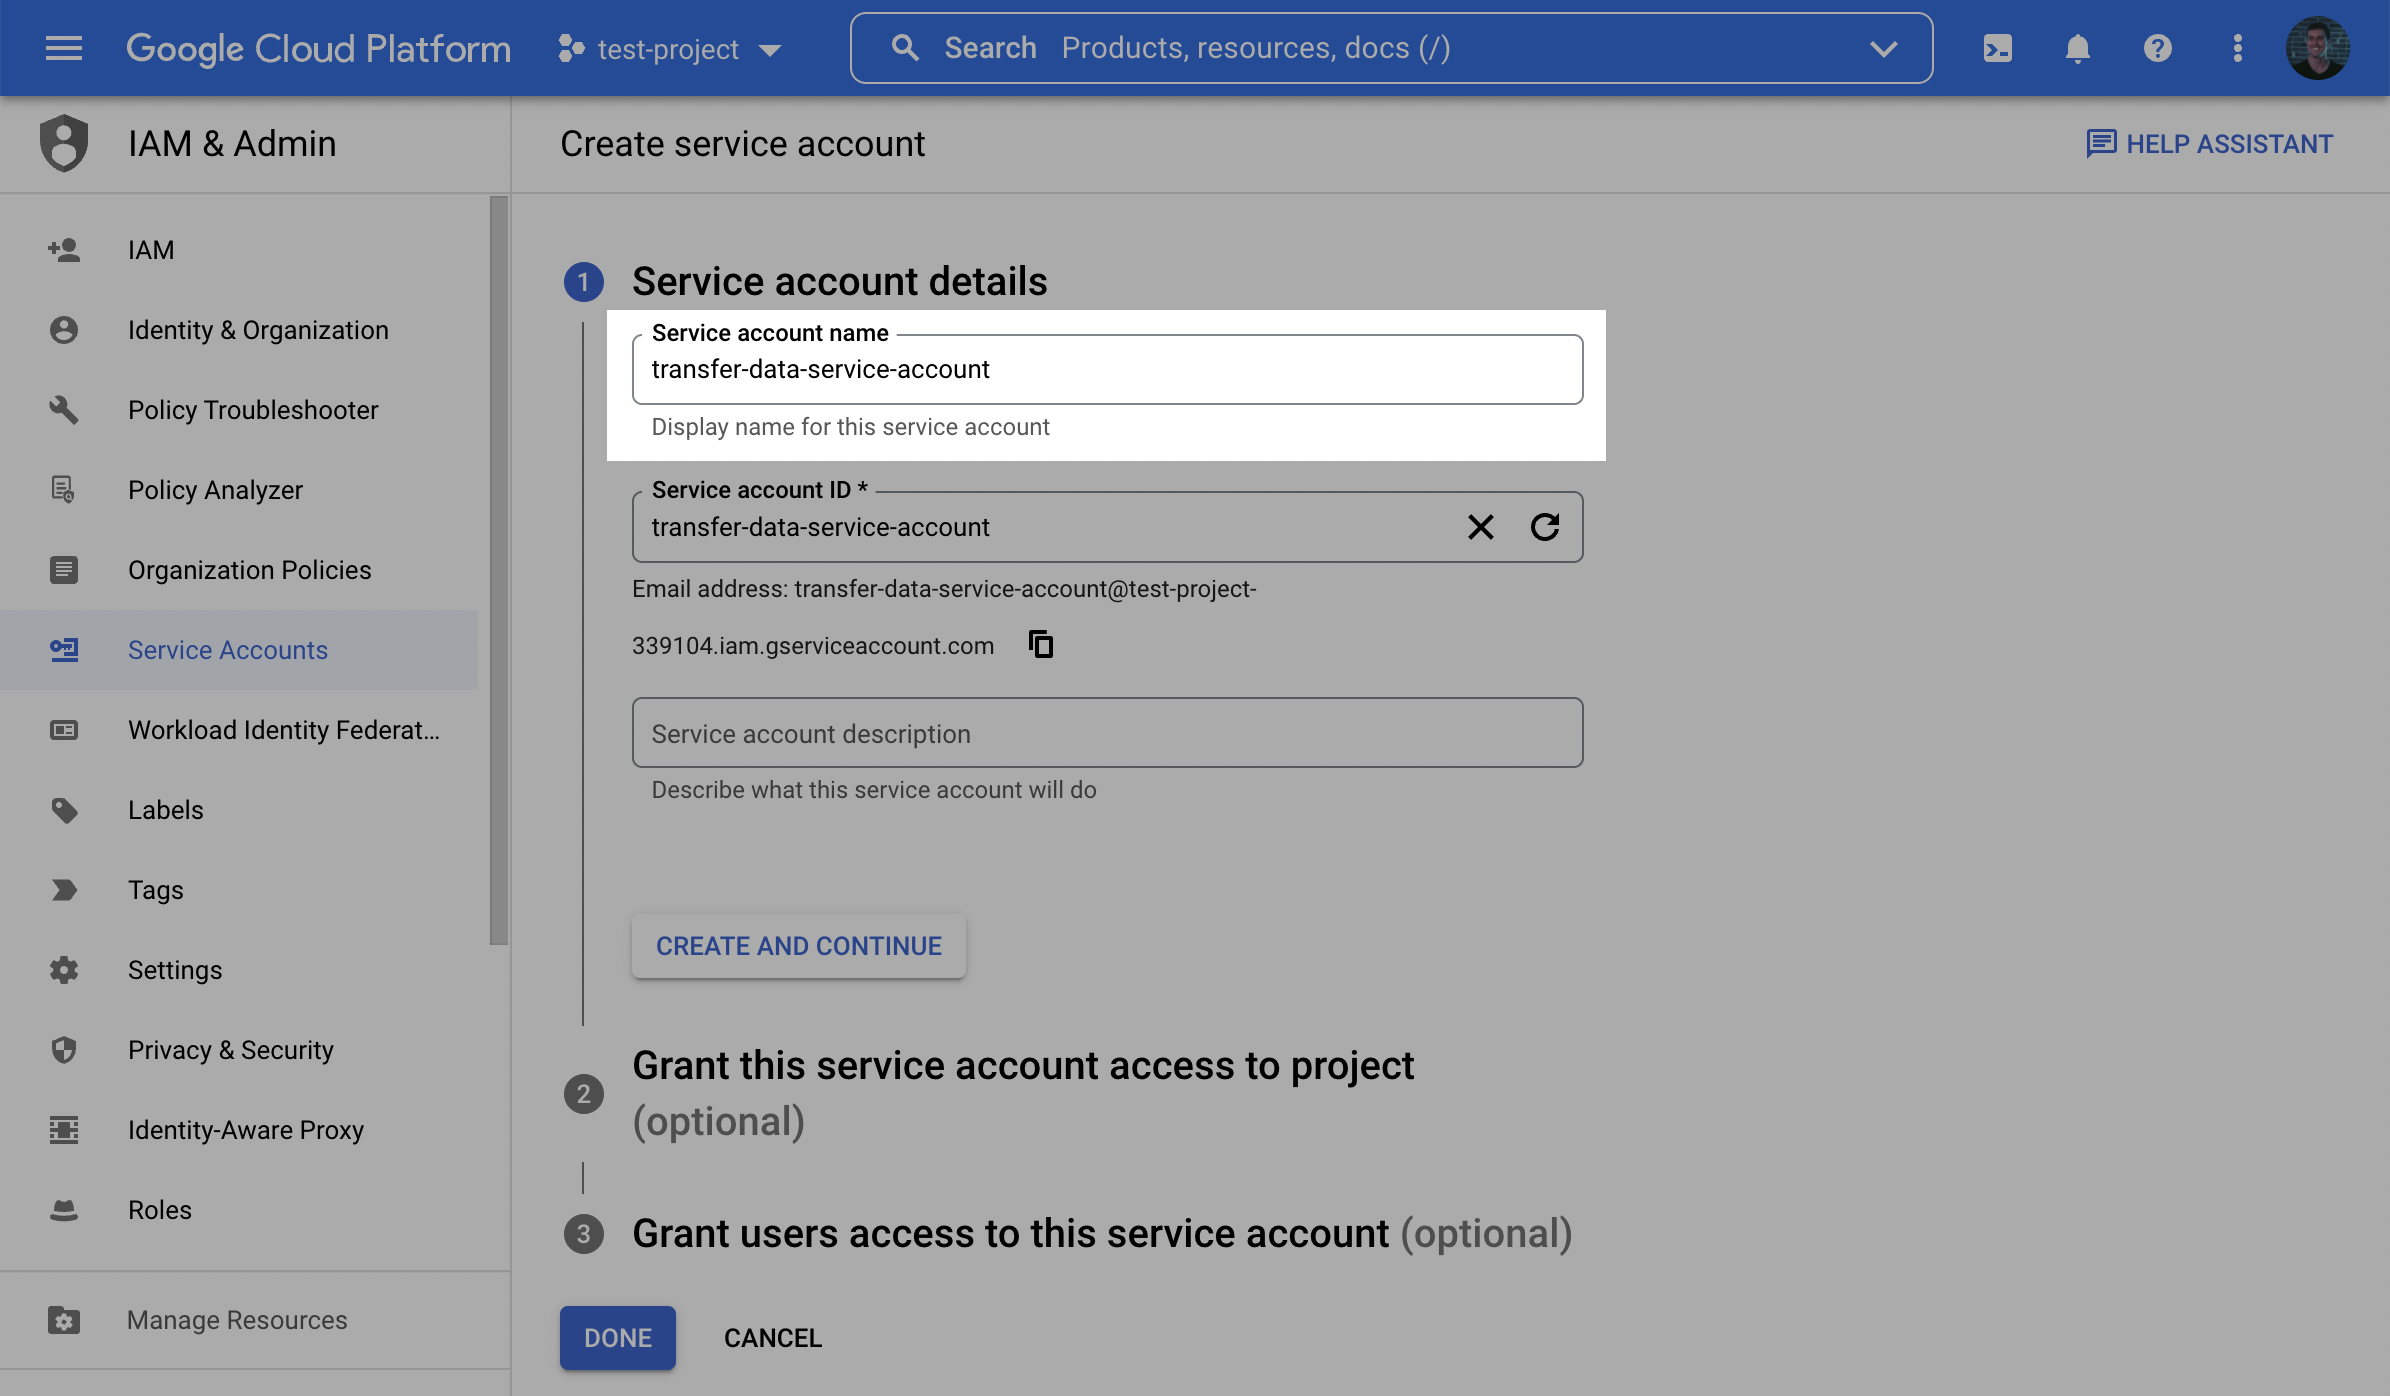
1. In the GCP console, navigate to the **IAM & Admin** menu, click into the **Service Accounts** tab, and click **Create service account** at the top of the menu.

2. In the first step, name the new **Destination service account** and click **Create and Continue**.
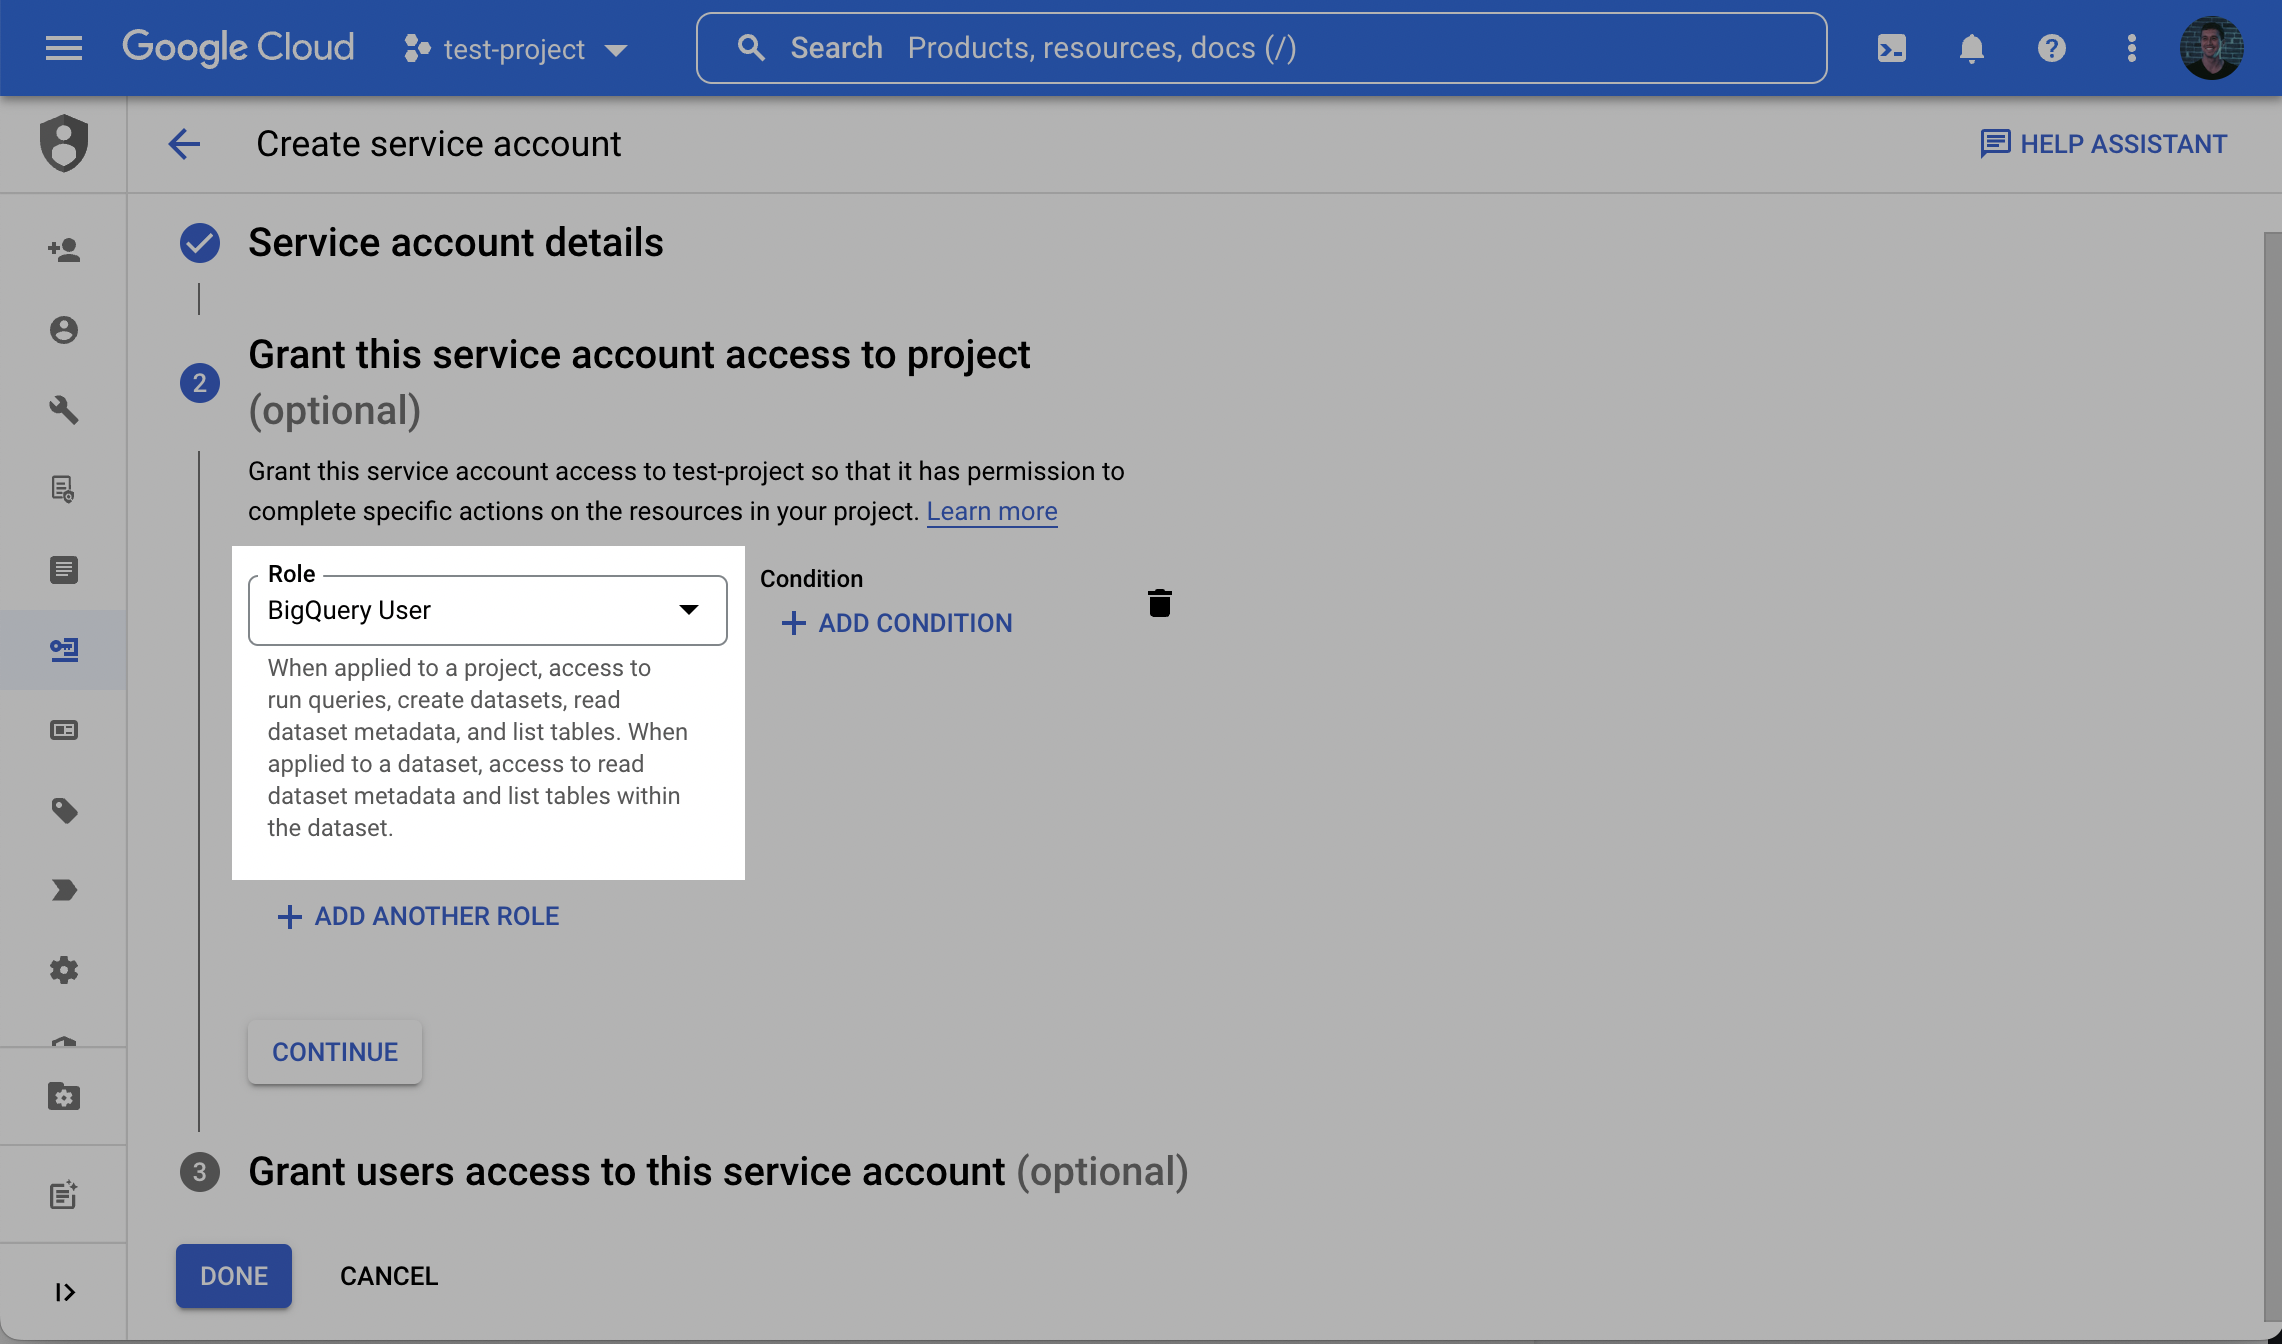
3. In the second step, grant the new **Destination service account** the **BigQuery User** role. This allows creating datasets, submitting load/query jobs, and accessing required metadata during setup.
**Alternative: dataset already exists**
Use least-privilege grants when your dataset is pre-provisioned:
* Project: grant `bigquery.jobs.create` to the **Destination service account**.
* Dataset: grant **BigQuery Data Owner**, or a custom role including at minimum `bigquery.datasets.get`, `bigquery.tables.create`, `bigquery.tables.delete`, `bigquery.tables.get`, `bigquery.tables.getData`, `bigquery.tables.list`, `bigquery.tables.update`, `bigquery.tables.updateData`, `bigquery.routines.get`, and `bigquery.routines.list`.
4. Click **Done** to finish creating the account.
5. In the service accounts list, click the newly created **Destination service account** to open its details and make a note of the **email** (this is different from the data-syncing service's own service account from the prerequisites).
6. Grant access to the **Destination service account** using one of the following authentication methods:
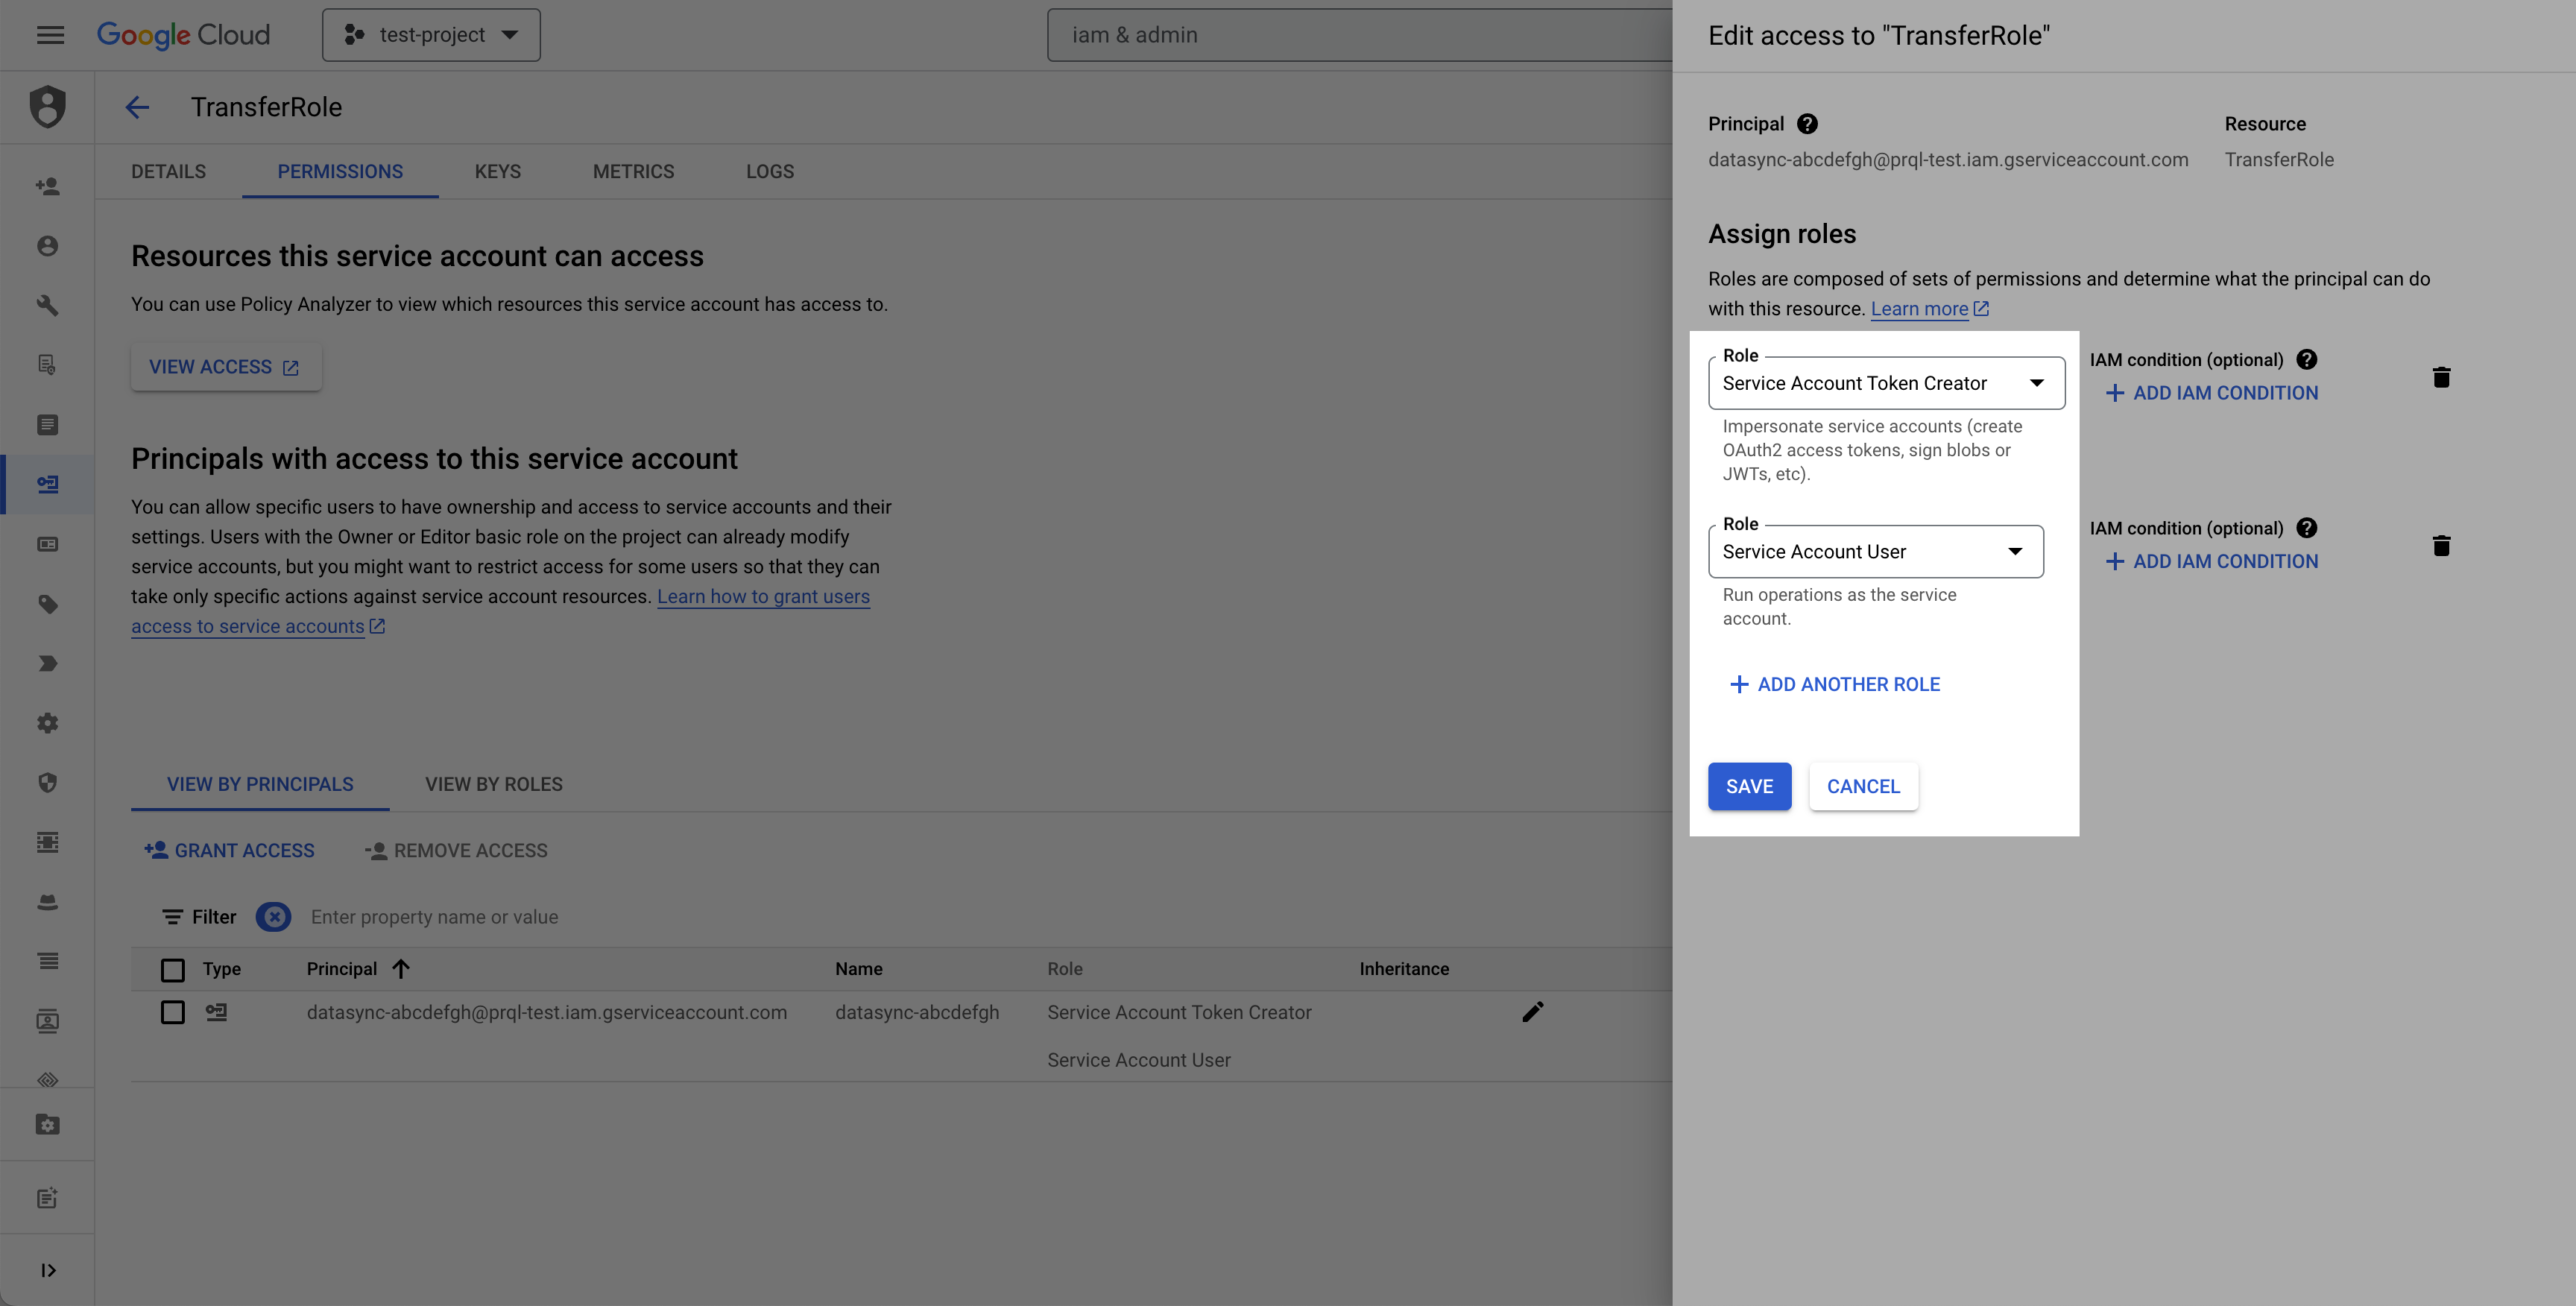
Navigate to the **Principals with access** tab, click **Grant Access**, and add the following principal and roles:
* **Principal:** the service account provided in the prerequisites
* **Roles to grant:** **Service Account Token Creator**, **Service Account User**
Only use this method when policy requires it — it is not recommended and presents a higher security risk than impersonation.
Generate a JSON key for the **Destination service account** and use it to authenticate: **IAM & Admin** > **Service Accounts** > open the **Destination service account** > **Actions** > **Manage keys** > **Add key** > **Create new key** > Key type: **JSON** > **Create**. Securely store the key.
Authenticate with OAuth client credentials issued by your own identity provider. We fetch a token from your identity provider and exchange it with Google using Workload Identity Federation, so no long-lived GCP keys are shared and access is revocable at your identity provider.
1. Configure an OAuth client (client ID and client secret) in your identity provider. The token endpoint must be reachable over HTTPS from the public internet, support the `client_credentials` grant with `client_secret_basic` authentication, and issue JWT access tokens (opaque tokens are rejected by Google).
2. In your GCP project, create a Workload Identity Federation pool with an OIDC provider pointing at your identity provider's issuer. Set the provider's allowed audiences to the value your tokens carry in their `aud` claim.
3. Grant the **Destination service account** the **Workload Identity User** role for the federated principal matching your tokens' `sub` claim: `principal://iam.googleapis.com/projects//locations/global/workloadIdentityPools//subject/`.
4. When creating the destination, choose the `client_secret_workload_identity_federation` auth method and provide the client ID, client secret, token endpoint URL, an optional scope (one or more unique space-delimited, case-sensitive scope values, e.g. `read write`), the Destination service account email, and the provider's full resource name as the workload identity federation audience: `//iam.googleapis.com/projects//locations/global/workloadIdentityPools//providers/`.
## Step 2: Create a staging bucket
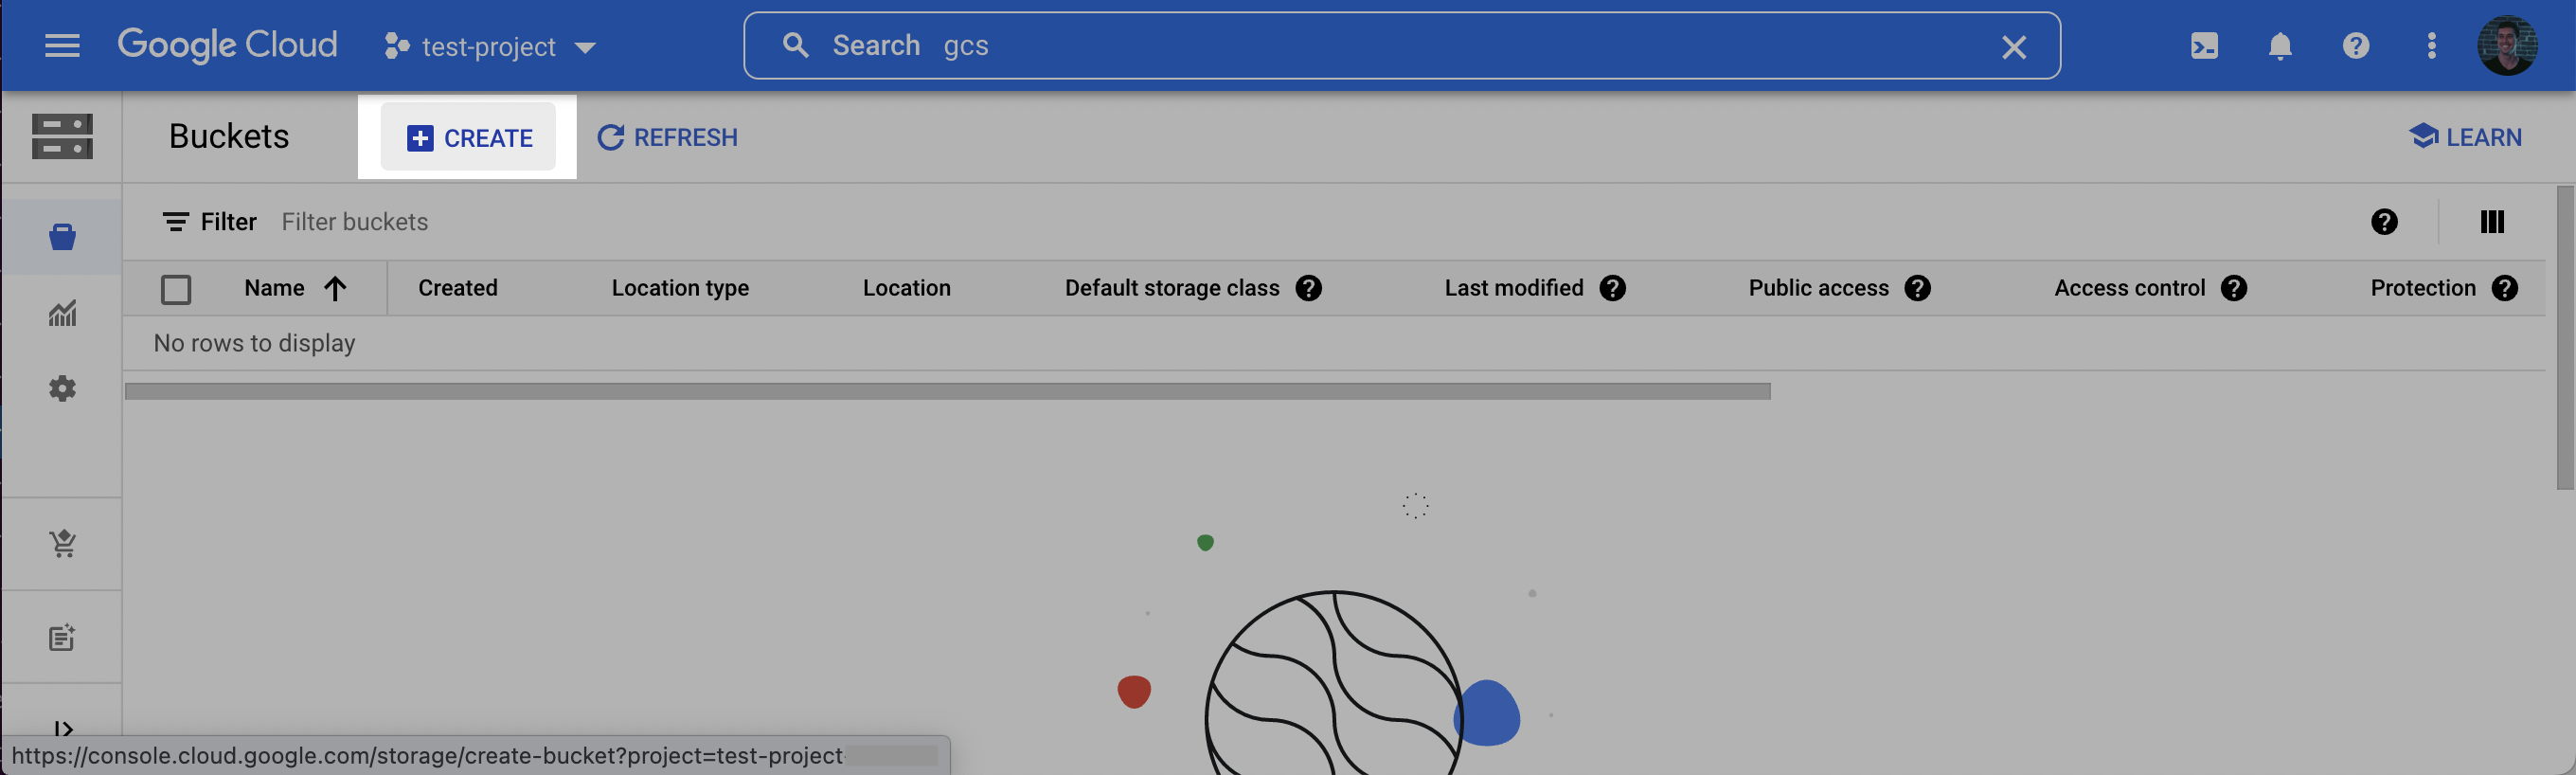
1. Log into the Google Cloud Console and navigate to **Cloud Storage**. Click **Create** to create a new bucket.
2. Choose a **name** for the bucket. Click **Continue**. Select a **location** for the staging bucket. Make a note of both the **name** and the **location** (region).
**Choosing a `location` (region)**
The location you choose for your staging bucket must match the location of your destination dataset in BigQuery. When creating your bucket, be sure to choose a region in which BigQuery is supported [(see BigQuery regions)](https://cloud.google.com/bigquery/docs/locations).
* If the dataset **does not** exist yet, the dataset will be created for you in the same region where you created your bucket.
* If the dataset **does** exist, the dataset region must match the location you choose for your bucket.
3. Click **Continue** and select the following options according to your preferences. Once the options have been filled out, click **Create**.
4. Ensure the bucket is **not public**. We recommend enabling **Uniform bucket-level access** and keeping all **Public access** blocked.
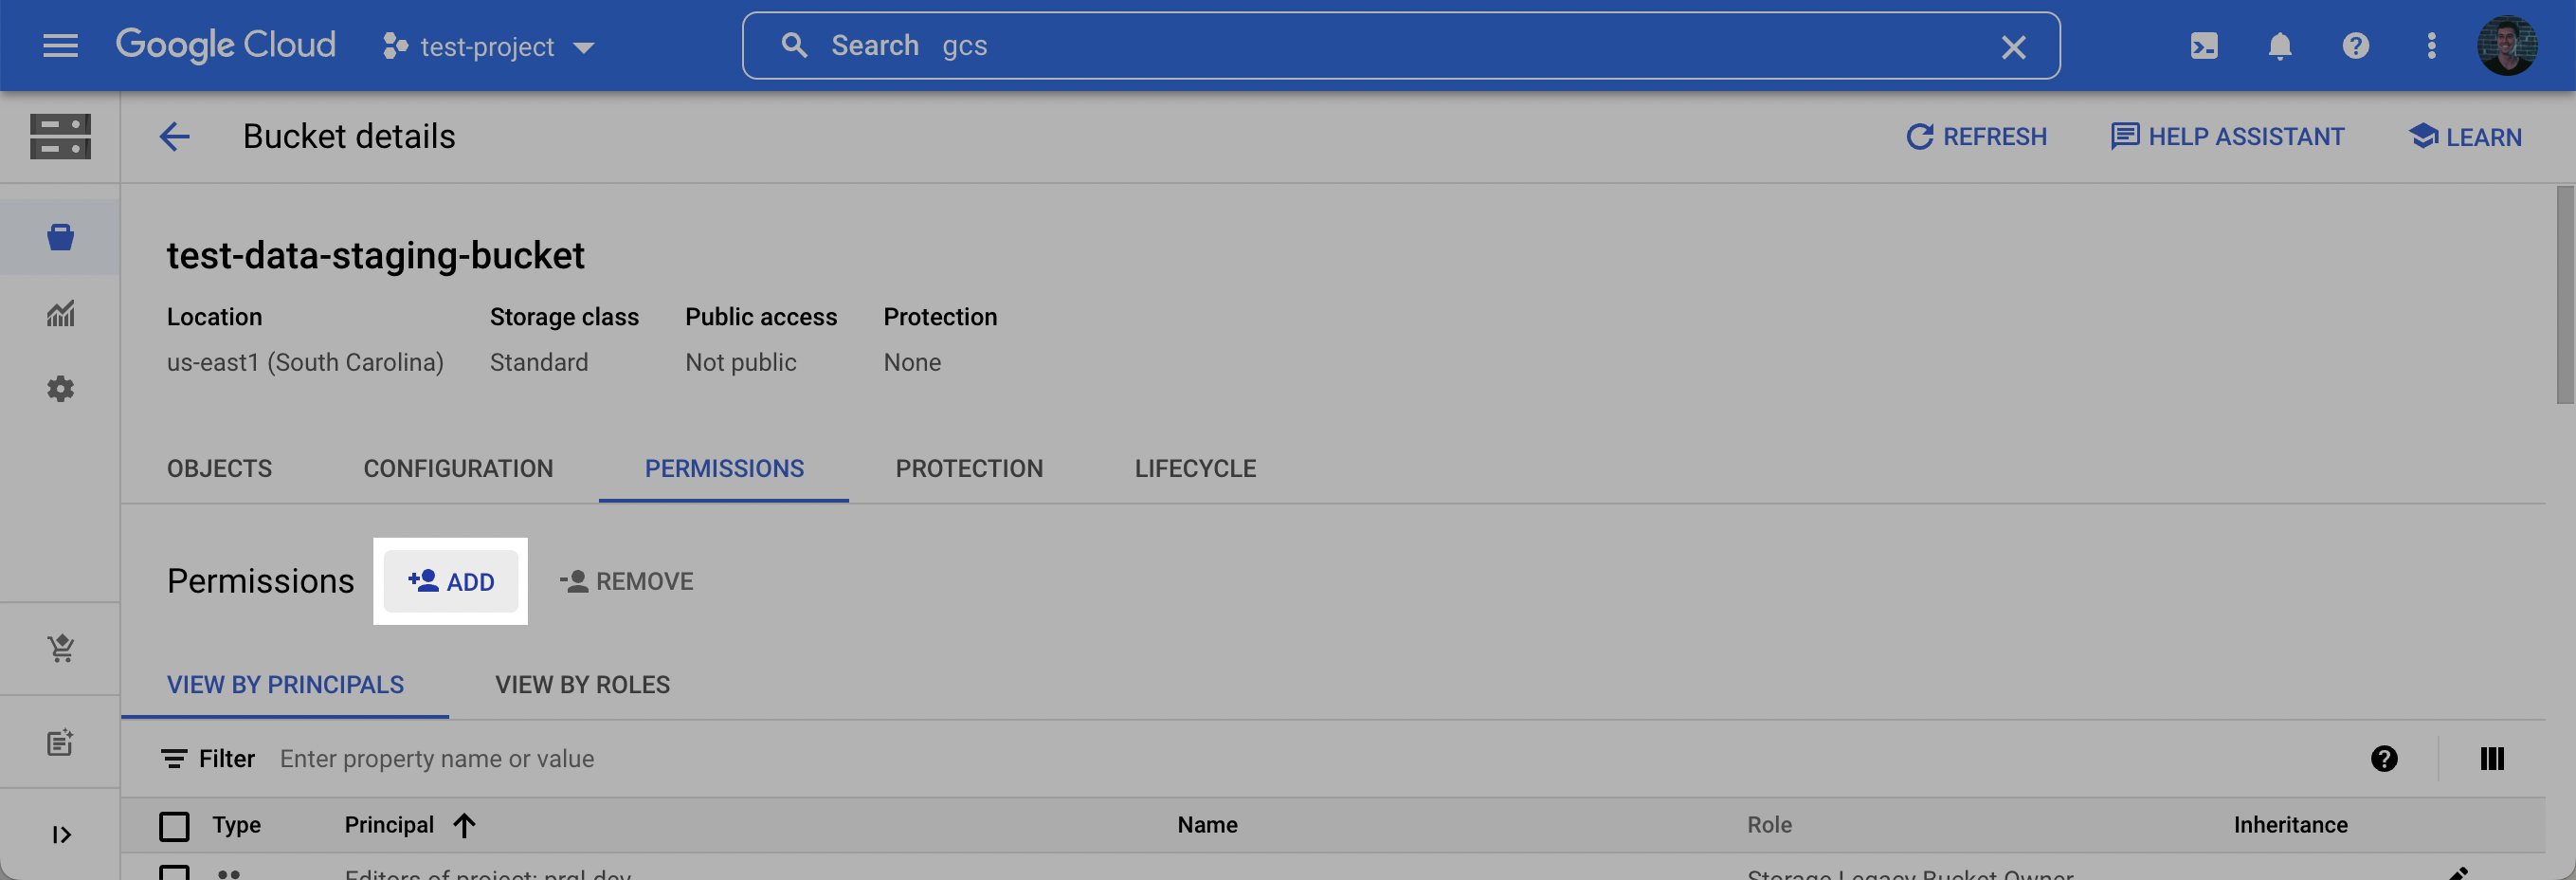
5. On the **Bucket details** page that appears, click the **Permissions** tab, and then click **Add**.
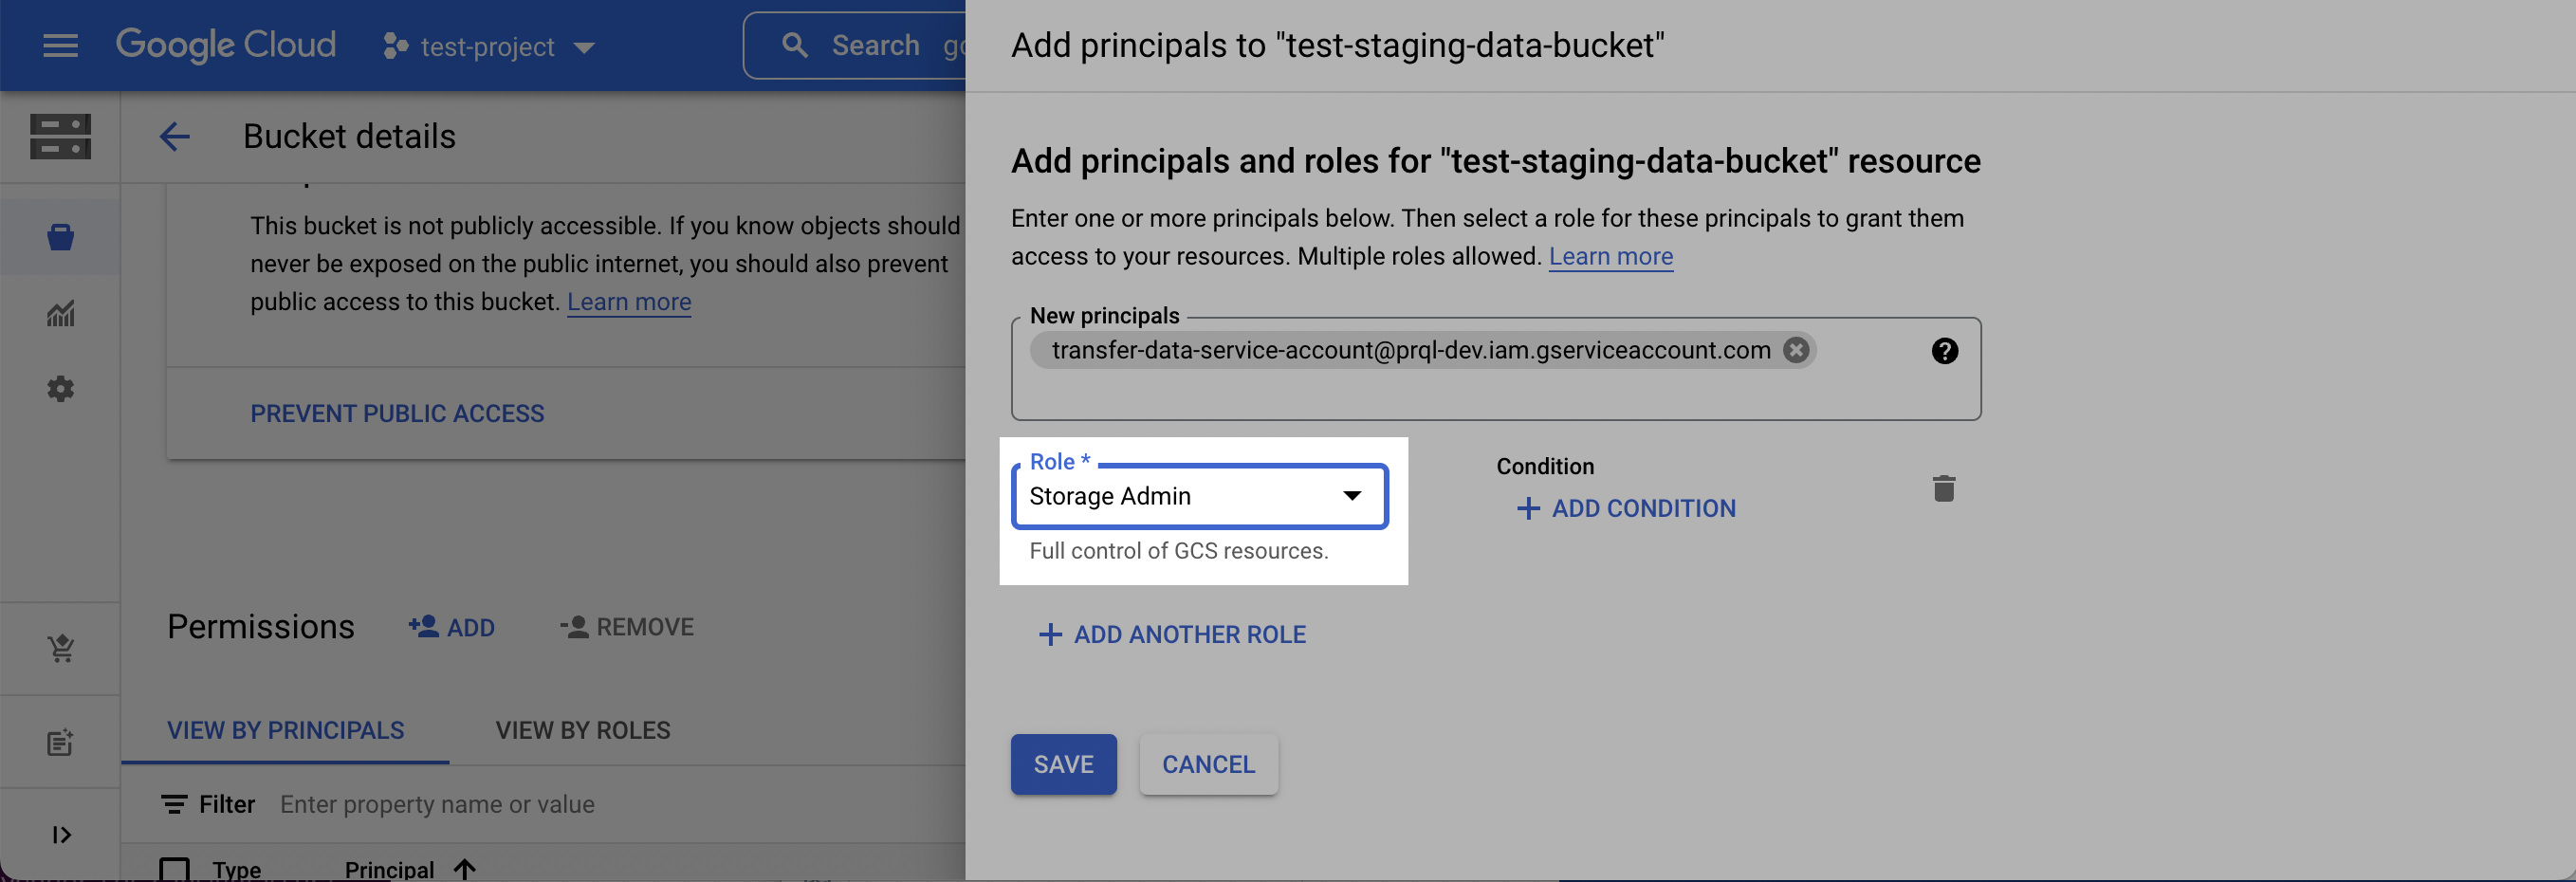
6. In the **New principals** field, add the **Destination service account** created in Step 1, select the **Storage Admin** role, and click **Save**.
**Alternative: tighter bucket scope**
We strongly recommend using a new, dedicated bucket solely for data transfers, for data isolation and to simplify permissions management.
If policy requires tighter scope than Storage Admin, grant only the following minimum actions to the **Destination service account**: `storage.buckets.get`, `storage.objects.list`, `storage.objects.get`, `storage.objects.create`, `storage.objects.delete` — either through a custom role, or by granting both **Storage Legacy Bucket Reader** and **Storage Object User**.
**Optional: add a short retention lifecycle policy**
You may configure a lifecycle rule on the staging bucket to automatically delete objects older than 2 days, since the bucket is not used to persist data. In the bucket's **Lifecycle** tab, add a rule with action "Delete object" and condition "Age: 2 days". Transfer logic automatically cleans up files after each transfer completes, so this step is optional.
## Step 3: Find Project ID
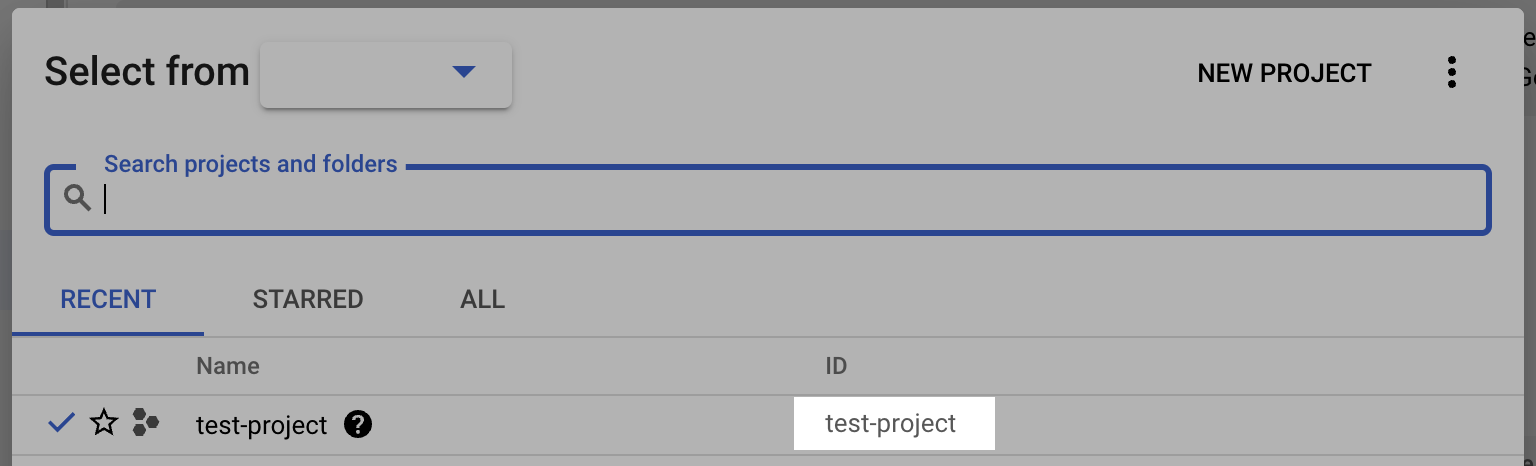
1. Log into the Google Cloud Console and select the projects list dropdown.
2. Make note of the BigQuery **Project ID**.
**Domain-restricted sharing supported**
This connection supports Google Cloud organization policies that restrict identities by domain. If your organization enforces domain-restricted sharing, you can allowlist the data-syncing service's principal according to Google's guidance on restricting identities by domain — see [Restricting identities by domain](https://cloud.google.com/resource-manager/docs/organization-policy/restricting-domains). Contact your Thanx representative to receive the customer ID to add to your allow list.
## Step 4: Add your destination
Securely share your **Project ID**, **Bucket Name**, **Bucket Location**, **Destination Dataset Name**, and **Destination service account** name with us to complete the connection.
## Permissions checklist
* Destination service account exists in your project.
* Project: Destination service account has BigQuery User. If the dataset is pre-created, instead grant the project `bigquery.jobs.create` plus dataset-level Data Owner (or a custom role with the minimum dataset, table, and routine permissions listed above).
* On the Destination service account: grant the data-syncing service's service account the Service Account Token Creator and Service Account User roles.
* Staging bucket is non-public and in the same region as the BigQuery dataset.
* Staging bucket: Destination service account has Storage Admin. If using tighter scope, ensure minimal object and bucket permissions are granted.
* Optional: a lifecycle rule deletes objects after roughly 2 days.
## FAQ
We use staging-assisted load to use BigQuery's native bulk-upload path, maximizing throughput to your destination.
Data is not persisted in the staging bucket and is deleted after each transfer. You may optionally add a lifecycle rule to auto-delete objects after roughly 2 days.
Yes. BigQuery is supported across all [GCP-supported regions](https://cloud.google.com/storage/docs/locations). Ensure your BigQuery dataset and staging bucket are located in the same region.
GCP IAM services can often take up to 10 minutes to propagate. Please wait a few minutes and try again.
You create one service account in your project with BigQuery/Storage permissions, and the data-syncing service impersonates it using its own service account. This means we never handle your private keys, all operations appear in your audit logs, access is via short-lived tokens, and you can revoke access anytime through your own IAM permissions. Direct service account access is not supported.
This documentation is built and hosted on [Mintlify](https://mintlify.com), a developer documentation platform.